
Use badges on a Relationship Map
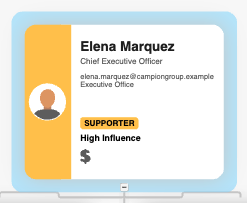
This article is for anyone editing a Relationship Map. When you finish, the people who matter carry a small icon on their card, so a reviewer can read the map without opening anything.
You do not need Crush or an Account Plan. Badges work on a standalone Relationship Map. If the canvas is empty, start with Create your first Relationship Map.
What a badge is
A badge is a small icon your admin defines once and anyone can apply to a card. Teams use them for things ratings do not cover: procurement contact, met in person, new in role, technical evaluator.
A badge is not influence or support. Set those in Add people and set influence and support. Use badges for the one or two things your team keeps repeating in meetings.
Before you start
- You can edit the map (PROLIFIQ RELATIONSHIP MAP Standard User, not Read Only).
- At least one badge is available to this map. If none are, the badge menu does not appear at all — an admin enables badges first.
Mark a card
- Open the map.
- Right-click the card. A short menu appears.
- Select Mark card.
- Pick a badge. It appears on the card and saves straight away.
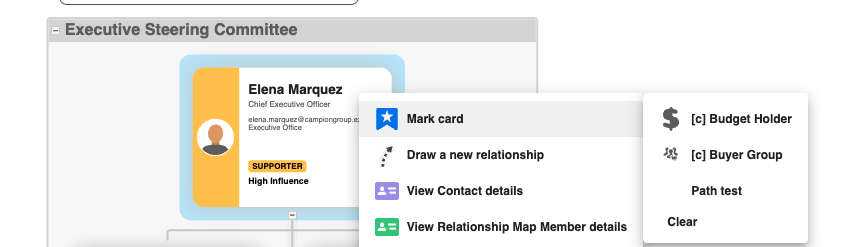
To mark several people at once, select the cards first (Ctrl-click on Windows, Command-click on Mac, or Shift-click to extend the selection). If Enable Drag Select is on, you can also drag a box around cards. Then right-click one selected card and use Mark card. The badge applies to every selected card.
A card can carry more than one badge. Two or three is readable; six is a wall of icons.
Remove badges
- Right-click the card.
- Select Mark card.
- Press Clear.
Clear removes every badge that was applied by hand to that card, not just the last one. There is no "remove this one badge" action — clear the card and re-apply the badges you still want. Badges your admin applies automatically stay on the card; you cannot clear those from the map.
One map, or everywhere
Where a badge shows up depends on a single setting.
| Setting | Where | Effect |
|---|---|---|
| Use Global Badges | Map settings (chart settings) | On: the badge follows the contact to every map they appear on. Off: the badge only shows on this map. |
| Badge Global Scope | Relationship Map Settings (org default) | The default your maps start with. |
Decide this before a team starts badging. Turning global scope on and off later changes which badges a map shows, because the same badge record is stored differently in each mode.
If your team uses badges for something that is true about the person everywhere ("procurement"), global is right. If it is true about this pursuit only ("meeting them next week"), keep it off.
When badges look wrong
| What you see | Usual cause |
|---|---|
| No Mark card in the menu | You have read-only access, or no badge is available to this map |
| A badge you expected is not in the list | The badge is marked For Automation Use Only, or it is not enabled for Relationship Maps |
| A badge you did not add appeared | It is applied automatically from a Contact checkbox field |
| Clear did not remove a badge | Automatic badges cannot be cleared from the map — uncheck the field on the Contact instead |
| A badge vanished from another map | Use Global Badges is off on that map |
| Right-clicking a group does nothing useful | Badges apply to person cards, not to groups |
Make badges available (admins)
Badges are records on the Relationship Map Badges tab. They ship with the package, and you can add your own.
To make an existing badge usable:
- Open the Relationship Map Badges tab and switch the list view to All.
- Open the badge.
- Check Used in all Relationship Maps for standalone Relationship Maps. For maps on an Account Plan, use Used in all Account Plans.
- Save.
To limit a badge to specific maps instead, leave that box unchecked and link the badge to a map from the Related tab, under the RM Svg Map Associations section.
Key fields on a badge record:
| Field | What it does |
|---|---|
| Relationship Map Badge Names | The record name |
| Label | The name users see in the Mark card menu |
| Geometry String | The SVG path that draws the icon — one path only |
| Fill | Icon color as a hex value, for example #808080 |
| View Box | Icon dimensions, for example 0 0 52 52 |
| Order | Position in the Mark card menu |
| Used in all Relationship Maps | Makes the badge available on every standalone Relationship Map |
| Used in all Account Plans | Makes the badge available on maps inside Account Plans |
| For Automation Use Only | Hides the badge from the menu so only automation applies it |
| Contact Field API Name | API name of a Contact checkbox — when that box is checked, the badge appears on the card |
Contact Field API Name is the simplest automation: point the badge at a Contact checkbox, add that field to the map's display fields in Relationship Map Settings, and cards pick the badge up on their own. Users cannot clear a badge applied this way.
Test a new badge on one map before you roll it out. A bad Geometry String or View Box shows as a missing or oversized icon on every card at once.