
Configure AI map generation
This article is for the Salesforce admin who will turn on AI-generated Relationship Maps. When you finish, a user can request a map in Salesforce and a structure comes back — or you know which setup step is still missing.
Skip this article if your org will only build maps by hand. Create your first Relationship Map does not require AI.
How generation works
- A user asks Salesforce to generate a map.
- The managed package sends the allowed account and contact data to Prolifiq’s server. The callout uses a Named Credential you create in this org.
- The server uses that customer’s API key / tokens and returns a map structure.
- Salesforce shows the generated map. The server calls back into the org as a dedicated integration user (JWT bearer), not as the person who clicked generate.
The package cannot ship the Named Credential or External Credential. Salesforce does not allow subscribers to edit that metadata inside a first-generation managed package, so you create both from scratch after install. There is no empty shell to fill in.
Before you start
- Crush or Relationship Map is installed for Admins Only. Install.
- Customer Success has sent the packet: API key, endpoint, Org ID / parameters, and the certificate for the callback Connected App.
- You can create External Credentials, Named Credentials, custom metadata records, Connected Apps, and permission sets.
Use the names in the CS packet. Screenshots below are from a current setup. Typical labels are CRUSH AI Cred and CRUSH AI Service.
1. External Credential
The Named Credential authenticates through an External Credential.
- Click the gear, then Setup.
- In Quick Find, enter Named Credentials. Open External Credentials.
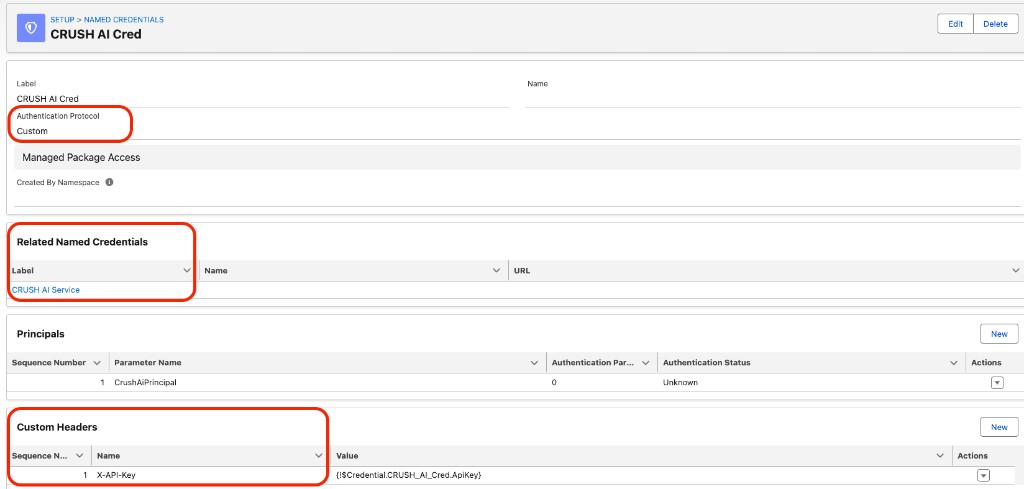
- Create a new External Credential. Typical label: CRUSH AI Cred.
- Set Authentication Protocol to Custom.
- Add a Named Principal (typical name CrushAiPrincipal). Put the API key from Customer Success on that principal (parameter typically ApiKey). Do not paste the raw key into the header.
- Add a custom authentication header:
- Name: X-API-Key
- Value:
{!$Credential.CRUSH_AI_Cred.ApiKey}(use your External Credential’s API name if it differs)
- Save. Related Named Credentials will list CRUSH AI Service after you create it in the next step.
2. Named Credential
- In Setup → Named Credentials, create a new Named Credential. Typical label: CRUSH AI Service.
- Set External Credential to CRUSH AI Cred.
- Enter the URL exactly as CS specified.
- Turn on Allow Formulas in HTTP Header.
- Turn on Enabled for Callouts after the URL is correct. Salesforce turns callouts off after some package upgrades — that is expected; turn them back on once you have verified the URL.
- Save.
You are creating this record. Do not wait for the package to add a blank credential.
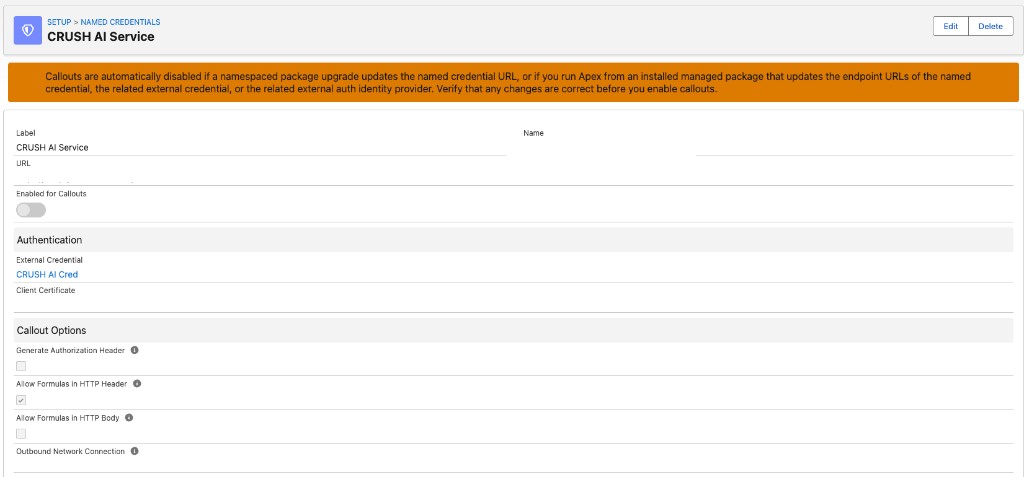
The example above may show callouts off and an empty URL. Your record must have the CS endpoint and Enabled for Callouts on before generate will work.
3. Point the package at the credential
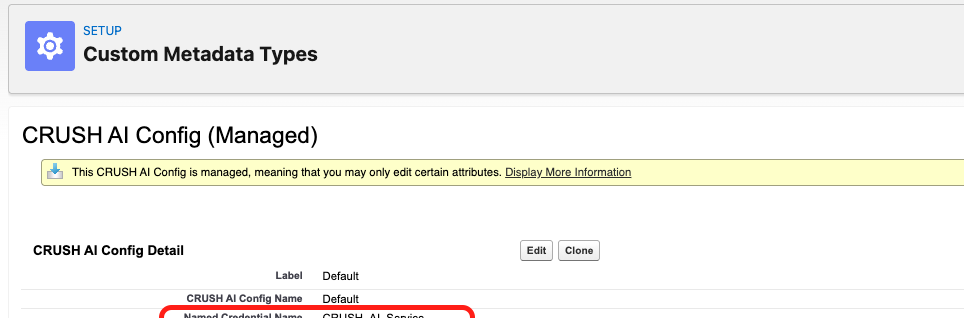
Apex looks up the credential by name in custom metadata. If this field is empty, generate fails even when the credential exists.
- In Setup, go to Custom Metadata Types.
- Open CRUSH AI Config.
- Open the Default record.
- Set Named Credential Name to the API name of the Named Credential (typical value CRUSH_AI_Service — not the label).
- Save. Leave Named Credential Override unless Customer Success told you to set one.
4. Permission sets
Assign these in addition to the Relationship Map (or Crush) set the person already has. Confirm the labels under Setup → Permission Sets. Search CRUSH_AI.
| Permission set | Who it is for |
|---|---|
| CRUSH AI User | People who run generate |
| CRUSH RM AI Integration | Integration / callback user (this set replaced CRUSH AI Integration, which is no longer in the package) |
| CRUSH_AI_Credential_Access (unmanaged) | External Credential principal access for the principal you created. A managed permission set cannot grant this, so you create this set in the org (or install the unmanaged set CS sent) and assign it. |
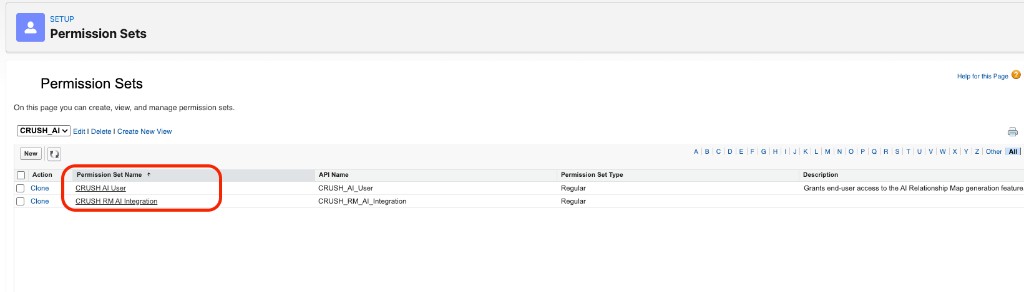
A common pilot stack for a seller is PROLIFIQ RELATIONSHIP MAP Standard User plus CRUSH AI User plus CRUSH_AI_Credential_Access. Assign CRUSH RM AI Integration and CRUSH_AI_Credential_Access to the integration user.
If a set is missing, do not invent it — ask CS.
5. Integration user and Connected App
The AI service calls back into Salesforce. That requires a dedicated user and a Connected App. CS generates the certificate and needs two values back from you.
- Create a dedicated integration user. Give it a license that can run Apex REST. Do not use a real seller’s user.
- Create or open the Connected App (typical name CRUSH AI Callback). Enable OAuth and Use digital signatures.
- Upload the certificate Customer Success generated and sent.
- Set the Connected App to Admin approved users are pre-authorized.
- Assign CRUSH RM AI Integration (and CRUSH_AI_Credential_Access) to the integration user. Pre-authorize that user on the Connected App.
- Send Customer Success:
- the Connected App Consumer Key
- the integration username
They use those for JWT bearer authentication. Do not send the seller’s username or the API key in that reply unless CS asks.
What success looks like
- External Credential and Named Credential both save without an authentication error.
- CRUSH AI Config → Default has the Named Credential API name.
- A user with the map set, CRUSH AI User, and principal access can run generate on a test Account that has contacts.
- A map structure appears (people and/or groups). An empty result is a failure.
If generate fails
Work this list before opening a ticket:
- The person who clicked generate has the map permission set, CRUSH AI User, and CRUSH_AI_Credential_Access.
- The principal has the current API key, and the X-API-Key header uses the
{!$Credential...ApiKey}formula. - The Named Credential uses CRUSH AI Cred, has the CS URL, Allow Formulas in HTTP Header is on, and Enabled for Callouts is on.
- CRUSH AI Config → Default → Named Credential Name is the Named Credential API name (not the label).
- The integration user is active, has CRUSH RM AI Integration, and is pre-authorized on CRUSH AI Callback.
- CS has the current Consumer Key and integration username.
Then walk Org settings and setup checklist.